
The Raspberry Pi Raspbian OS has basic support for displaying video built in. In this article, we will cover using Raspbian’s built in camera commands using the latest Raspbian Stretch Lite operating system. This is part three of a four-part series on using a Pi for video surveillance.
These commands can offer near real time camera control but don’t directly offer the extra control options that the previous two solutions provided. If you need real time camera access in a Pi without all the bells and whistles, using the built-in commands might be the right solution for you. Besides, controlling the camera with commands that you type in is a lot of fun as well.
What you will need:
- Raspberry Pi 3 or Pi Zero W
- Raspberry Pi v2 camera (NOTE: Pi 3 and Pi Zero W use different video cables)
- MicroSD Memory Card
- Pi Power Adapter
- MicroSD card writer
- Raspbian Stretch or Stretch Lite OS (formally called Jessie)
- Keyboard & video adapters (if you us the Pi Zero W)
Optionally you will need:
- Your choice of case
I used a Raspberry Pi Zero W Camera Pack from Adafruit that included the Pi Zero W and the 8 MP camera. This includes the Pi Zero W, camera, correct cable & a nice case. You will need to get a power supply and a microSD Memory card for it. You will also need keyboard and video adapters as the Pi Zero W uses smaller connectors than the Pi 3.

Installing
For installation, all you need is the Raspbian OS image written on the memory card. We have covered how to do this in the last few articles. So, I will only cover it briefly here.
- Download the Raspbian Stretch Lite OS
- Write the image to the memory card (Etcher works great!)
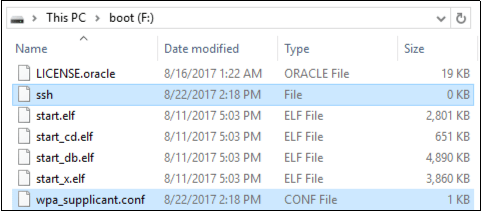
- Setup WiFi & create an empty file called “ssh” in the microSD card root to auto enable SSH:
- Insert memory card into the Pi & connect camera
- Connect your peripherals & power adapter to power on
Now all we need to do is turn the camera on in the Pi Configuration.
- Login as user: pi and password: raspberry
- Type in “sudo raspi-config”
- Cursor down to “Interfacing Options” and hit “enter”
- Select “P1 Camera” and hit “enter”
- And then “yes” and “enter” to enable the camera:

- Hit enter at the “OK” prompt, then cursor down and hit enter on “Finish”
- Hit enter on “Yes” to reboot
And that is it, we are now ready to start using the camera!
WARNING: Because we enabled ssh, be sure to change the default password to a long complex password if your Pi is on a public accessible network.
Running Locally
First, we will look at controlling the camera locally, with the Pi connected to a monitor and with a keyboard attached, and then we will cover using the camera remotely from another computer.
As we only have the lite version of Raspbian installed, it will boot directly to a terminal prompt after you log in. At this local prompt enter:
raspivid -t 10000
You should see pretty much real-time video with almost no latency displayed on your monitor. The “-t” switch just tells how long to display the camera in milliseconds, or in our case, 10 seconds.
If you want save the video you record, just add the “-o” output switch to your command and add a filename:
raspivid -o epicvideo.h264 -t 10000
The resultant video will be saved in your current directory, which by default is “\home\pi”.
If you want, you can add the date & time to the video by adding “-a 12” to the command above:

For more information on the Raspivid command and how to convert the output to mp4 format, check out the official raspivid webpage and camera webpage.
You can also take image snapshots using the Raspistill command:
raspistill -o epicpicture.jpg
The camera will display to the screen, and after a few seconds will take a single picture which is saved as the output name provided. More information on taking single shots and additional camera commands can be found on the official raspberry pi webpage.
If you SSH remotely into your Pi using a program like Putty, you can run the camera commands, as seen below:

But the video doesn’t show up remotely, it simply displays on the monitor connected to the Pi. So technically you could run the Pi like this to capture remote images, but you will not be able to remotely view what the camera is seeing. To do so, we need some additional setup.
Running Pi Camera Remotely with Netcat
There are numerous websites that show how to remotely view video using the raspivid command. I will cover one of the ways that seems to produce the best video quality with little latency. For this section, we will run the Pi “Headless”, which means without keyboard or video. We also need a secondary computer to use as a remote viewer, I chose to use a Kali Linux system as it already has the two commands we will be using, netcat & mplayer, installed.
From your remote system, SSH into the Pi:
- From a Linux terminal type “ssh pi@[your Pi IP Address]”
- Enter the password, “raspberry” when prompted:

Leave this SSH Terminal window open and open an additional Terminal on your Linux system. We will be entering commands into both the SSH terminal and this secondary regular Linux terminal.
In the regular Linux Terminal, run this command:
netcat -l -p 5000 | mplayer -fps 60 -cache 2048 –

This starts the mplayer command and gets it ready for input using netcat.
In the SSH Linux Terminal, run this command:
raspivid -t 0 -w 1280 -h 720 -o – | nc 192.168.1.39 5000
![]()
This starts the raspivid command and sends it to the Linux computer using netcat. It may take a second or two to appear, but after that, full speed, close to real time video should appear on your Linux computer:

And that is it! With just the two commands, we can view the video remotely.
When finished, it is always best to shut down the Pi before removing power from it:
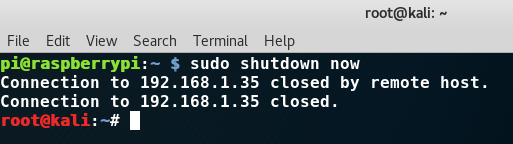
Just give it an extra few seconds to actually shutdown after running this command before unplugging the power.
Conclusion
In this article, we just quickly covered how to connect to and view a camera feed using the built in “raspivid” command. We also saw how to stream the video to a remote system using netcat. There are numerous different ways you can stream remote video with raspivid, and even upload it directly to YouTube, but from what I have seen many cause a bit of latency in the process. This is why I prefer to use the netcat command as there is little to no latency.
In the next article, we will see how to stream video using Python, so stay tuned!

thanks this has much lower latency to the official raspivid streaming option. Can you give more explanation of command line options you used? I tried to modify and stream with framerate -fps 120 or 60 and then this had a really big latency of few seconds.
LikeLike
Welcome! I show the commands I used, High res at 120 FPS is most likely way too high for the Pi to stream without lag. I just used 60.
LikeLike
I’m attempting to connect to the Pi via Ubuntu Windows Subsystem. Once I run “netcat -l -p 5000 | mplayer -fps 60 -cache 2048 –” in the terminal it pauses at the cache loading and goes no further. On the pi side -> the command to forward the feed “raspivid -t 0 -w 1280 -h 720 -o – | nc 192.168.1.39 5000” opens the the camera feed and then freezes.
My overall goals is to turn the pi into a stream I can access as a webcam/camera for my PC but I need the latency to be as low as possible.
LikeLike
Sockets don’t work in the Windows subsystem in WSL v1, you need WSL v2, which you can get through the Windows Insider program (slow ring). But then, it still might be funky. I would just spin up Ubuntu through VMWare or Virtualbox, it will work much better. 😉
LikeLike