
Raspberry Pi’s new Pi Zero W is great for projects. In this article, we will cover how to use a Pi Zero W as a surveillance camera using RPI Cam Web Interface software and a ZeroView Pi window camera mount.

This is part two of a four-part series on using the Raspberry Pi as a surveillance camera solution. Last time we covered using MotionEyeOS which provided a ton of software features and options, though it did have some streaming latency. In this article, we will cover using RPI Cam Web Interface Software which doesn’t have as many software features as MotionEyeOS, but does have a slightly better streaming speed.
When I wrote this article, I used The PiHut’s unique ZeroView case, though you could use a standard Pi Zero W camera case.
For this project, you will need:
- A Pi Zero W
- MicroSD Memory Card
- Pi Power Supply
- Raspberry Pi v2 8 MP Camera with Pi Zero W cable
- RPI Cam Web Interface Software
Optionally you will need:
- ZeroView case
- Pi Battery Pack
Also, if you are not comfortable connecting and configuring the Pi Zero W in a “headless” configuration (without keyboard, monitor or mouse) then you will need adapter cables and possibly a USB hub to connect your peripherals to the smaller Pi Zero W connectors.
ZeroView Case
The ZeroView Pi Zero camera mount is one of the coolest camera “cases” that I have found for the Pi Zero. The mount is made to hold a Pi Zero and a camera in a special case that mounts to a window or any glass surface. The case looks and works great:

The unique configuration of the ZeroView is nice, because you can mount it in places that you couldn’t place a normal case. It is convenient too, as unlike some other Pi Zero camera cases, you have easy access to the MicroSD card.
Add a battery pack and you have a lot of freedom in placing your surveillance camera. I have placed it in a house window, away from an electrical outlet, to cover an area that wasn’t view-able with my commercial surveillance system. I have even mounted it to my car’s windshield and used it as a “dashboard” cam, with exceptional results!
RPI Cam Software
RPI Cam Web Interface is a great solution for Pi surveillance cams. It offers pretty good real time streaming with little latency (at lower resolutions), and offers some good options for setting up motion detection and other basic recording and scheduling options. I am not going to spend a lot of time covering the RPI Cam software as the official Wiki has complete information on installing and using it.
The software is run on a headless Pi Zero (no keyboard, mouse or video). After the RPI Cam Web Interface is installed, you view and control the camera from a web interface that can be viewed through any web browser that is on the same network.
Installing
As mentioned the RPI Cam wiki includes complete install instructions, so I will only include a brief install section – Always check the RPI Cam official Wiki for the latest install instructions.
- Download the Raspbian Jessie Lite image
- Write image to the MicroSD Memory card (Etcher works great!)
- To set your Wi-Fi information in a headless environment see this article.
- Connect your camera to the Pi Zero & assemble your case (if you have one)
- Install the memory card and apply power
- Enable the camera in the Raspbian settings
- Open a terminal, clone the program from GitHub and install it:
- git clone https://github.com/silvanmelchior/RPi_Cam_Web_Interface.git
- cd RPi_Cam_Web_Interface
- ./install.sh
The install can take quite a while to run. There are a lot of packages that will be installed. The software will be completely setup when finished. Reboot when done, and you are all set!
Connecting to and using the Camera
To connect to the camera, open a web browser and surf to the IP address that was assigned to your Pi Zero W and click on “html”:
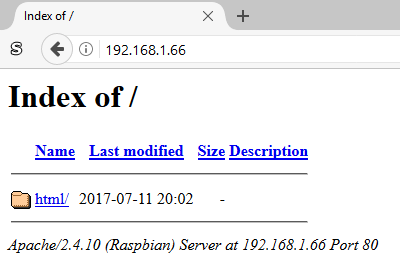
Or you can just surf directly to the camera interface by entering ‘IP ADDRESS/html/’ in the browser. You should see a live stream of the camera and the camera menu system:
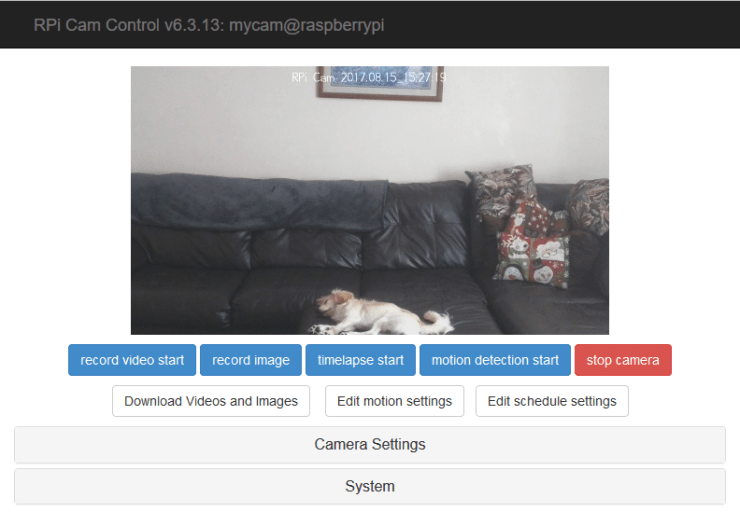
The interface is pretty straightforward to use, just click the menu item that you need. So, for instance to start a video recording, click “record video start”. Click “record video stop” when done.
You can change the camera settings by using the “Camera Settings” menu. Keep in mind that there are some minor latency issues when streaming, which get incrementally worse as you increase resolution. Though recorded images seem much better than what is streamed.
– To configure motion detection:
- Click “motion detection start”
- Then click “Edit motion settings”
- And then configure the settings you need
NOTE: Some of the settings can be a little cryptic, check the software Wiki for more information.
– Set up a recording schedule by clicking the “Edit Schedule settings” button.
– Access saved data with the “Download Videos and Images” button:

– Then just pick the file you want and download it.
As always it is best to shutdown the system when done, instead of just pulling the plug. You can do this in the System menu:

Conclusion
In this article, we covered creating a Pi Zero W powered surveillance camera using RPI Cam Web Interface and a ZeroView case. At lower resolutions, you get near real time streaming with little latency. This offers a better streaming speed solution than the article we covered last time using MotionEyeOS. Though RPI Cam does not provide as many features and options as MotionEyeOS.
In the next two articles, we will cover accessing the camera directly using command line prompts. This will increase our streaming time to pretty much real time with no latency. But we lose the added benefits of software options and capabilities that both MotionEyeOS and RPI Cam provides.

Great job, finally someone with a straight forward tutorial. Where the camera and end result were matched.
MUCH appreciated
LikeLike
Thank you!!
LikeLike