Do you enjoy the programming language Python and want to create a surveillance camera using a Raspberry Pi 3 or Pi Zero W? Well, you are in luck, in this article we will cover using Python PiCamera!
This is the last of four articles on creating a surveillance camera using Raspberry Pi boards. As we have progressed we have gone from solutions that provide a lot of features, but due to the features have some video lag – To solutions that offer pretty much real-time video streaming, but don’t offer the extra bells and whistles.
Python PiCamera is a Python solution for controlling a Raspberry Pi camera. It is very fast and, if you are a Python guru, you can add camera options to your programs. Even if you are not a Python master (I am definably not!), PiCamera is still pretty simple to learn by just reading through the documentation. It is also easy to use thanks to the example programs they provide.
For a great intro check out Raspberry Pi’s, “Getting Started with PiCamera”.
This will be a rather short article as we will be able to use the same setup and configuration as the previous article, we will just be using Python PiCamera commands instead of Raspivid. We will also be using the same PiCamera scripts as were used in our Portable Night Vision System article, with some minor changes.
Setup
Simply follow the hardware requirements & setup instructions from the previous article. As with the previous articles you can use a Pi Zero W or Pi 3 pretty much interchangeably, just keep in mind that they use different video cables and you will need adapters to connect a keyboard and video to the Pi Zero W.
Once your image is written to the memory card, don’t forget to set your WiFi using the “wpa_supplicant.conf” file and create a blank file called “ssh” in the memory card root before you insert it into your Pi. You will also need to enable the camera in the Raspberry Pi configuration. Raspberry Pi has provided a complete walkthrough of connecting, configuring and running the Pi using PiCamera including sample scripts, this is a must read.
Because we are using Raspbian Lite, and we will be using the PiCamera Remote script that requires it, you will need to install “Python3-PiCamera” as seen below:
sudo apt-get install python3-picamera
Viewing Video with PiCamera
Let’s get started. Here is a simple program from the PiCamera documentation to view the camera feed:
from picamera import PiCamera

from time import sleep


camera = PiCamera()

camera.start_preview()

sleep(20)

camera.stop_preview()
This will display the camera on the video screen for 20 seconds.
To create the file:
- Use the text editor nano, “nano camera.py”
- Copy and paste the program into the text file:

- “Ctrl-x”, “y” and then “enter” to save the file as “py”
To run it:
- Type in, “chmod 777 camera.py” to make it executable
- Then, “python3 ./camera.py”
And that is it! The video display should show the camera feed.
Recording Video with PiCamera
Here is a simple program to record a feed, a simple date time stamp has been added:
import datetime

import time

date = datetime.datetime.now().strftime("%m_%d_%Y_%H_%M_%S")


import picamera


with picamera.PiCamera() as camera:

camera.start_preview()

camera.start_recording("/home/pi/"+ date + "video.h264")

camera.wait_recording(30)

camera.stop_recording()

camera.stop_preview()
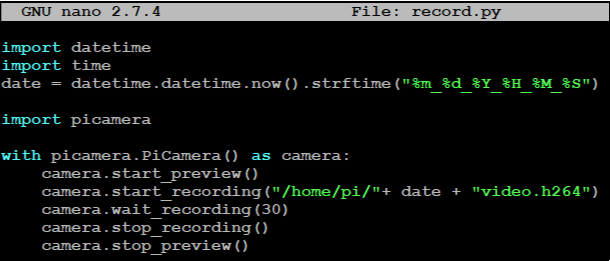
This will display the camera on the monitor for 30 seconds, and record it to a file called “video.h264”, with a date/ time stamp, in your “/home/pi/” folder. Simply save the file as “record.py”, make it executable, and then run it as we did the previous program.
Remote Streaming with PiCamera
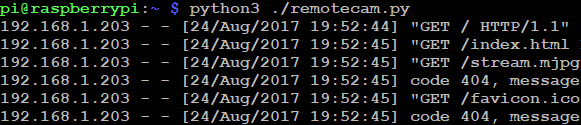
Viewing the camera directly is nice, but for a surveillance camera, we need to be able to access it remotely. The PiCamera Documentation Webpage includes a script for accessing PiCamera from a remote system. The script is located here, just save it as a .py file, make it an executable file and run it.
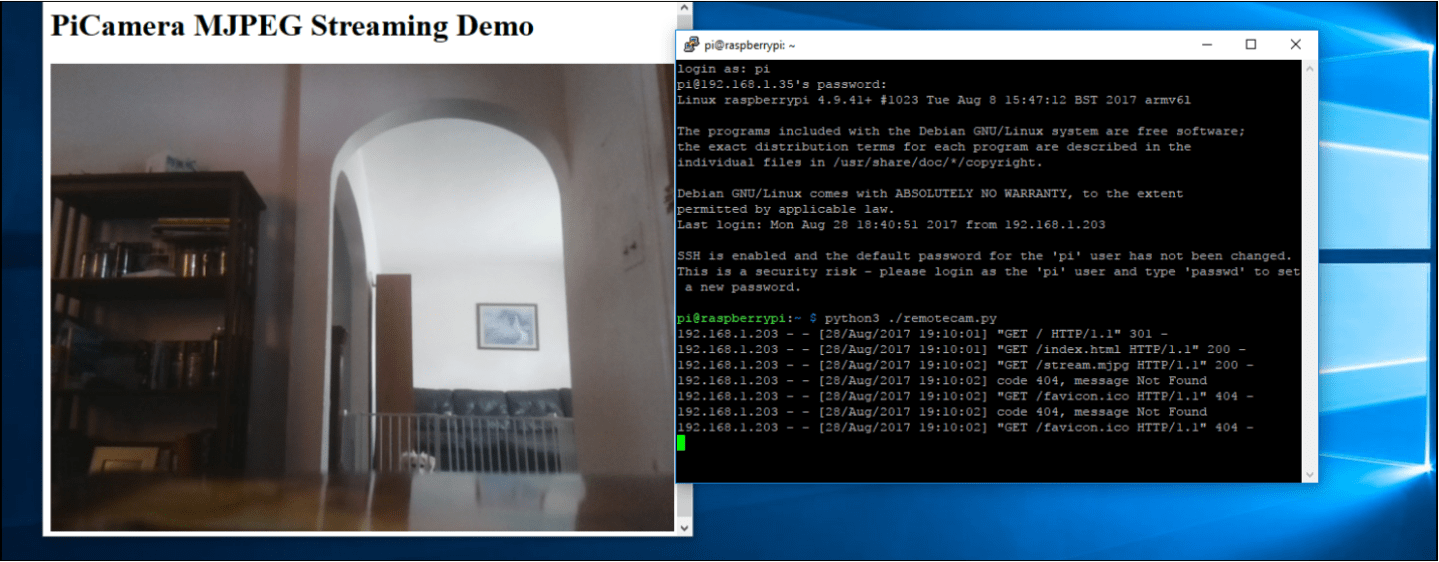
You should see this on your Raspberry Pi:
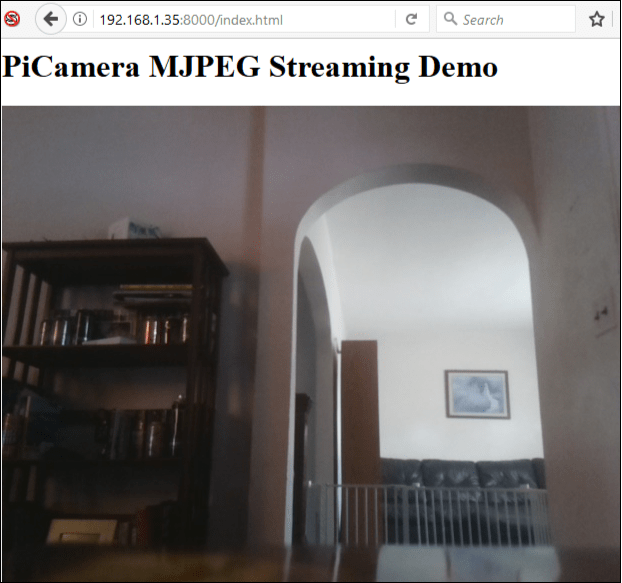
Now on a remote system on your network, open a browser and surf to:
[Your_IP_Address]:8000
And you should see the feed from your camera:
For a true remote access camera, you can run the Pi Zero W camera headless (without video or keyboard) and just SSH into the camera to run the “remotecam.py” program. Just be sure to enter “sudo shutdown now” when done, so the camera shuts down properly. For much more extensive information on PiCamera, check out the PiCamera Documentation Webpage.
Conclusion
In this article, we covered controlling a Raspberry Pi camera using Python PiCamera. PiCamera is a great solution for users who are Python savvy and want to include camera control in their programs. The authors of PiCamera have also made it very easy for non-programmers to use by providing great documentation and easy to understand sample programs.
So, there we have it. Over the past several articles I have demonstrated 4 separate ways on how to use a Raspberry Pi 3/Pi Zero W as a surveillance camera, progressing from feature rich user provided software to commands built into the Raspbian Operating System.
Since I have started this article series I have found addition programs that you can use, my best advice to check each of them out and see which one best fits your individual needs. But most importantly, have fun doing it!

One Pingback