
The Raspberry Pi Zero W is a perfect choice for many projects. It is the smaller relative of the Raspberry Pi, but in many ways functions exactly like the original Pi. In this article, we will cover how to use a Pi Zero W as a surveillance cam, using a regular or a Night Vision camera and MotionEyeOS.

This will be part one of a four-part article series on using Raspberry Pi products as security cameras. I started with using MotionEyeOS as it is a fairly easy install and hands down the most feature packed method. Using MotioEyeOS you have a plethora of options for setup, recording, even streaming the video to another location. All of these options do come at a price, as of the 4 methods that we will cover, this option produced one of the slowest video captures. Even at the lowest resolution there seemed to be a couple second lag between recording and viewing the stream on another PC.
For this project, you will need:
- A Pi Zero W
- MicroSD Memory Card
- Pi Power Supply
- Raspberry Pi Camera or Night Vision Camera (for the Pi Zero W)
- Wi-Fi connection
- MotionEyeOS software
Optionally you can use:
- Pi Zero W Case
- Battery pack
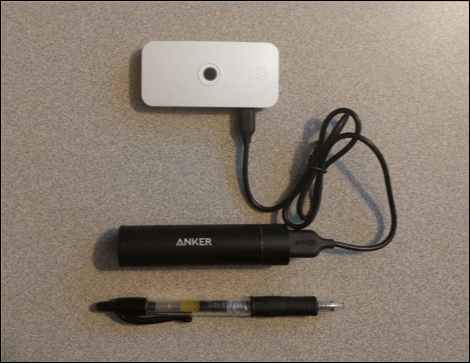
For the regular camera setup, I used an Adafruit Pi Zero W Camera kit that included the Pi Zero W, the Pi Camera v2 (8 Megapixels), and a case. Though this camera has great resolution, it does draw a bit more power and can run a little on the hot side. I also used an Anker Battery Pack which allowed the camera to be a bit more mobile:
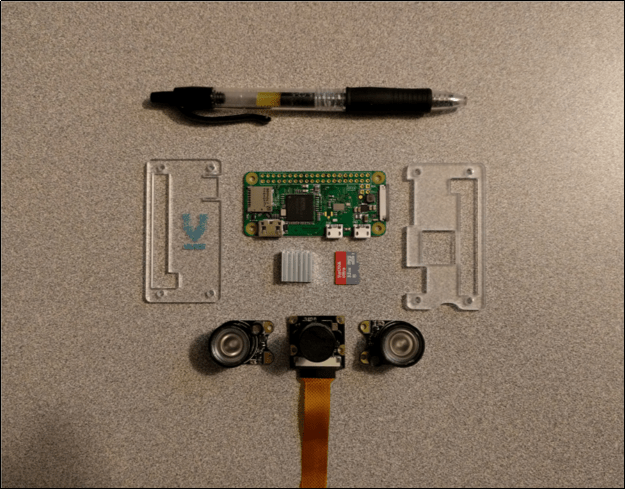
For the Night Vision Camera, I used a Raspberry Pi Night Vision Camera with 2 Infrared LEDs and a Vilros Pi Zero W Complete Starter Kit. I couldn’t find a case specifically for the night vision camera, so I just bought the starter kit so I could have the extra adapters for future projects:
No matter which option you choose (night vision or regular camera) the Pi Zero W setup with MotionEyeOS is the same.
Setup
Setup is very easy for this project. Basically, all we need to do is write the MotionEyeOS image to the memory card, set your Wi-Fi router info, and then just boot it up. You could do this exact same project using a regular Raspberry Pi 3, the only difference is that the Pi and Pi Zero use DIFFERENT video cables. So, you may have to order a different cable if needed. Other than that, the steps for the project would be identical.
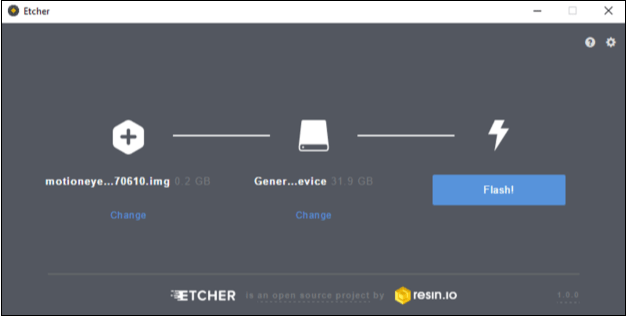
- Download and write the MotioEyeOS image to your MicroSD Card. Etcher works great:
- After writing image, and before you remove the card from the writer, you need to set your WiFi settings. To do so, follow these directions:
http://www.raspberrypi-spy.co.uk/2017/04/manually-setting-up-pi-wifi-using-wpa_supplicant-conf/
Basically, you need to copy the following text, add in your Wi-Fi name and password, and save it to the root directory of the SD card. If are doing this in Windows, you need to set the file End of Line conversion to Linux format. An easy way to do this is to use the program “Notepad ++”:
country=us

update_config=1

ctrl_interface=/var/run/wpa_supplicant


network={

 scan_ssid=1

 ssid="Your Wi-Fi Router"

 psk="Your Wi-Fi Password"

}
And then, if you are using Notepad ++
- Click “Edit”
- Then “EOL conversion”
- And “Set to Linux”
As seen below:

- When finished, save the file in the MicroSD card root as “wpa_supplicant.conf“.
- Insert the memory card into the Pi Zero W, connect the camera, assemble the case if you purchased a case for yours, and then plug the power in.
And that is it, you don’t need a keyboard, mouse or monitor attached as we will be connection to the camera via a PC web browser.
Connecting to the Camera
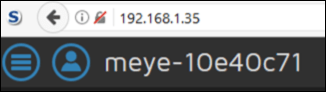
Wait a few seconds for the camera to boot and auto-connect to your WiFi, and then enter the camera’s IP address into a web browser. In a few seconds, you should see a screen like the one below:

Congratulations, you have just built your first surveillance camera with a Raspberry Pi!
There are two icons on the upper left of the title bar. The circle with three lines is the Preferences (or settings) button. The person icon is used to change users. You are logged in by default as a regular user, so there will not be a lot of options that can be set. To get to the complete settings available you must be logged in as admin.
Click the person icon to login in as administrator:
- Login as admin, no password
- Next, click the Preferences icon (Circle with three lines) to bring up the settings menu:

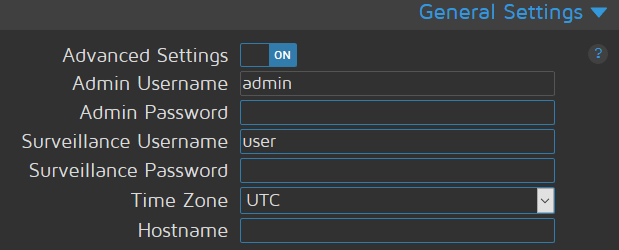
- Turn Advanced Settings “on”
- Click “Apply” at the top of the screen
Now set your admin and user passwords. Also set the Time Zone:
(Never hook a device up to the open internet without setting a long complex password)
Under Video Device, set the resolution and frame rate options that you want. A Higher Resolution/ Frame Rate will slow the Pi video streaming down.

A word of caution, don’t enable “Fast Network Camera” mode if your camera doesn’t support it, you will lose configuration options and your camera may not work.
Next, set working Schedule to “on”. Here you can set the days and times that you want the camera to record:

Once the working schedule is set, it is time to select if you want still Images or Movies recorded. Turn on the one you want:

If you choose images, just pick the options you want:

Or for movies:

In the movies section, you can change Recording Mode to “Motion Triggered” or “Continuous” for 24/7 recording. Maximum Movie length is nice, I set mine to like 15 minutes (900 seconds), so every 15 minutes a new movie file is created, instead of one huge massive recording.
Now, click the “Settings” button at the top to hide the settings screen. You should just see your camera feed in the browser:

Click on the camera feed itself and you should see icons appear on the feed window:

The first icon on the right is full screen, the second the picture storage button, third the movie storage button and the wrench opens the preferences screen.
If you click the movies button, the one that looks like a “Play” button, you should see any movies that your camera has recorded:

You can download the available movies or delete them.
When you are finished using your camera, it is a good idea to shutdown the device, instead of just powering it off. Shutdown is located in the General Settings:

Conclusion
In this article, we covered how to install and use MotionEyeOS on a Pi Zero W. As mentioned this setup will work using either the regular Pi regular or Night Vision camera. They both work identically with MotionEyeOS, as seen below:

MotionEyeOS is nice because it offers a ton of options for making the surveillance camera work the way you want – Be it one that captures stills on motion detect, or one that records video 24×7 and saves individual files in 15-minute increments.
Over the next couple articles, we will cover additional camera setups that may not offer as many features, but have increasingly better streaming speed, approaching near real time.

Stepped me through easily. Got mine up and running in less than half an hour!
LikeLike
Thanks Bill, appreciate it! 🙂
LikeLiked by 1 person
Thanks for the outstanding tutorial! My finicky SD card reader gave me more grief than the camera setup.
LikeLike
Thank you!
LikeLike
Hi. How can I know my pi zero already successfully boot up and connected to wifi?
I have follow your guide but I still can’t connect to my raspi zero. my raspi zero led only blinking for a few second then off. Is that need to write Jessie os image first before write motioneyeos? Please help me.
LikeLike
Hi, the MotionEyeos is a stand alone image, so you do not need to install Jessie or Stretch first. Does your router shown the Pi as connected? Check your router manual, but there should be a way to log into your router and list connected devices. This will tell you that the Pi successfully connected and was given an IP address. You can then use that IP address your router gave to it, to connect to the Pi. If you are familiar with the nmap command, you could also use that to find the IP address, if not just check your router.
LikeLike