Kali Linux is one of the most feature rich, advanced penetration testing Linux distributions available. In this article we will cover installing it on the $10 Raspberry Pi Zero platform.
The Raspberry Pi is a great project board, but it can also run operating systems. Kali Linux has over 600 computer security tools, and can run on a Pi. The latest Pi Zero W is smaller than the Pi 3, and is about the size of a stick of gum. Installing Kali on it makes it an interesting choice for certain security uses, especially for penetration testers and red team security groups.
In this post we will cover downloading and installing Kali Linux on a Pi Zero W.
First some notes – Though the Pi Zero W has onboard Wi-Fi & Bluetooth, on the current Kali Pi Image, Bluetooth doesn’t seem functional and the Pi Zero W Wi-Fi chipset doesn’t seem to support monitoring mode. There are other, possibly better solutions for Kali on the Pi that we will look at in the next article.
Using Kali on a Pi is a little more involved than running it on a regular PC. The Kali image for the Pi boots to a command prompt, there isn’t a GUI installed by default. Also, only a handful of tools are installed on the base image. This is on purpose to make the Kali Pi image as sleek as possible. You install the tool packages or individual tools that you want.
All right, enough intro, let’s get to it!
For this article you will need:
- Raspberry Pi Zero W
- MicroSD Memory Card (I used a 32GB card)
- SD card writer
- Pi Zero W uses a micro USB port, so you will most likely need an adapter and a USB hub for your keyboard & mouse
- HDMI video adapter for the Pi Zero W
- Kali Linux Operating System Image
Installing Kali Linux
To begin we will need to download the Kali Linux image for the Pi Zero W and write it to the microSD card.
- Download the Pi Zero W image from Offensive-Security
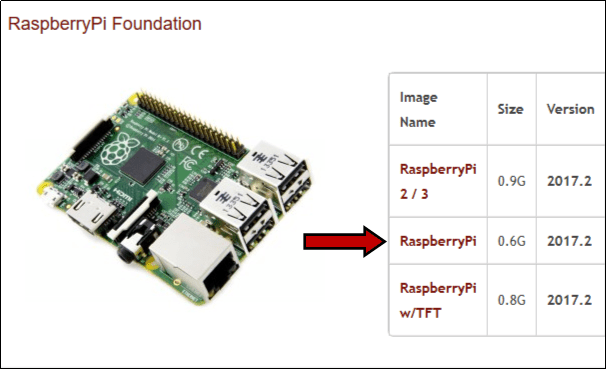
If you look at the download page, it can be a little confusing. Offensive Security doesn’t list the Pi Zero as an option. You actually need to use the one labeled “Raspberry Pi” as seen below:
And then:
- Expand the image (I used 7 Zip)
- Write the image to the SD Card (Etcher works great)

When writing the image, make sure you have your microSD card selected as your target, before you click “Flash!”
When the process is complete, insert the memory card into the Pi, connect keyboard, mouse, video and then power it up.

At the Login prompt enter “root” for the user name and “toor” for the password.

Congratulations, you have just installed Kali Linux on a Raspberry Pi!
Setup Wi-Fi
Next, let’s connect to a Wi-Fi network so we can update the software and pull down the tools. We will need to add our Wi-Fi settings to the interfaces file located at “/etc/network/interfaces”. It should look like the example below:
auto lo
iface lo inet loopback
auto eth0
iface eth0 inet dhcp
auto wlan0
allow-hotplug wlan0
iface wlan0 inet dhcp
wpa-ssid [WiFi Name]
wpa-psk [WiFi Password]
Reboot the Pi to enact the changes. You can do so from the command prompt by typing, “reboot“.
After reboot, it is a good idea to update the Kali install:
- apt-get update
- apt-get upgrade
Go take a break, this can take a long time.
Installing Metapackages
As mentioned earlier, the Pi Kali image only has a few tools installed by default. This way you can custom tailor your Pi without bogging it down with possibly unnecessary software. You can install any tools that you wish with the apt-get install command, but Kali has collections of tools, bundled by topic, that you can install. These are called “metapackages”.
Contents of the Metapackages are explained on the Kali Metapackages website.
These packages of tools include:
- kali-linux-forensic
- kali-linux-pwtools
- kali-linux-rfid
- kali-linux-sdr
- kali-linux-top10
- kali-linux-voip
- kali-linux-web
- kali-linux-wireless
These packages should be self-explanatory by name. The top10 contains the top 10 most commonly used tools (like Aircrack-NG, BurpSuite, Wireshark, etc.) The tool definitions also include the tool package size, so this too helps you gauge if you have room on your memory card for them or not.
To install any of the tool packages, just use “apt-get install” with the package name. So, if we wanted to install the Kali Wireless tool package, we would use:
apt-get install kali-linux-wireless
Several tools have questions about running as root, or specific tool options, just answer the questions as they appear. Some of the package installs can take a very long time to finish.
When done, reboot the Pi.
SSH
It works best if you run the Kali tools from the command line on the Pi. Since it has wireless built in, we can run the Pi “headless” and connect to it via SSH. According to the official Kali documents, SSH keys on ALL arm images are pre-configured with the same keys. This and the root password needs to be changed.
Changing the SSH host keys can be accomplished by doing the following:
- rm /etc/ssh/ssh_host_*
- dpkg-reconfigure openssh-server
- service ssh restart
To change the root password just use the “passwd” command. This is very important, especially if you will be using SSH.
And then connect to the Pi from another computer using SSH or Putty:

With SSH, you can now run commands on the Pi remotely, like running an nmap scan:

Desktop
Lastly let’s talk about using the Desktop interface on the Pi Zero. My advice is, don’t, the Pi Zero just doesn’t seem to have the horsepower. If you absolutely need a GUI, the Xfce desktop is preferred.
To install Xfce4:
- Run the following command: “apt-get install kali-defaults kali-root-login desktop-base xfce4 xfce4-places-plugin xfce4-goodies”
- use the default config when prompted
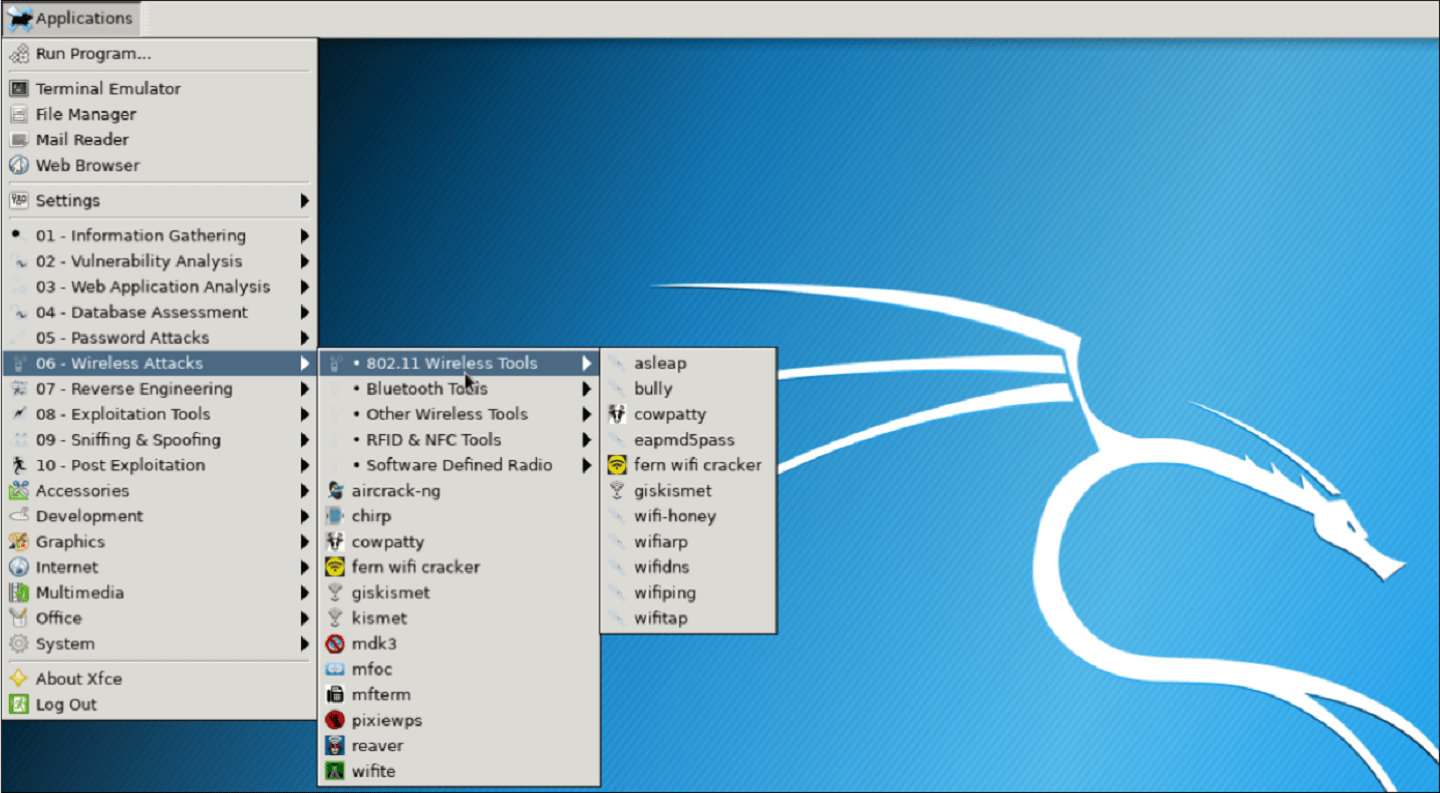
On reboot, it should boot up to the graphical desktop:

The GUI interface is functional, but it is too slow to be practical on the Pi Zero W. Running it on a Pi 3 would produce much better results.
Conclusion
Though it may be more practical to run Kali on the more powerful Pi 3, running Kali on a Pi Zero can be a lot of fun. Its small size also opens up some unique usage possibilities. For example, due to its size a pentester or red teamer could hide or disguise the Pi Zero fairly easily.
Also, because of its low power usage, I was able to run mine off an Anker “lipstick” style battery for several hours with no problems:

Bluetooth & wireless support on the Pi Zero could be an issue – You could use different adapters, but by then you kind of defeat the purpose of the Pi Zero’s small footprint. Depending on your needs, it may make more sense in some circumstances to run Kali on the larger Pi3.
In the next article, we will look at running Re4son’s “Sticky Fingers Kali-Pi” a Kali Pi for a solution that addresses these issues and offers some interesting capabilities.
If you are interested in learning how to use Kali Linux, check out my “Basic Security Testing with Kali Linux” book on Amazon.com.

Leave a comment