The P4wnP1 is an exciting and feature rich USB attack platform that runs on a Raspberry Pi Zero.
The P4wnP1 turns your Pi Zero/Zero W into a physical security Ethical Hacking pentest tool. In this article, we will cover installing P4wnP1 on a Pi Zero W and using several of its payloads against a target system running Windows 10.
For this article, you will need:
- Rasberry Pi Zero W (I purchased mine from adafruit.com with a case)
- Raspberry Pi Power Adapter
- MicroSD Memory card
- MicroSD card writer
- P4wnP1 software
You will also need a target computer to plug the P4wnP1 into (I used a Windows 10 PC) and a secondary computer to SSH into the Pi to control and modify the P4wnP1.
Installing
The author covers several ways to install P4wnP1, always check the author’s tool site for the latest install instructions. Though I found installing P4wnP1 using a headless Pi Zero W connected to a Wi-Fi network through SSH a little easier.
This is how I installed it, it is a combination of the author’s directions with a standard Pi Zero W headless Wi-Fi setup:
- Download Raspbian Stretch Lite
- Write the Raspbian image to MicroSD card, Etcher works great
- Leave the card in the reader, there are some files that need to be edited
- Setup your WiFi settings via a “conf” file on card, following this article
- On the boot partition, edit the file config.txt and add the line “dtoverlay=dwc2” at the end of the file to enable USB gadget overlay.
- On boot partition, insert “modules-load=dwc2,g_ether” into cmdline.txt between “rootwait” and “quiet”. This enables the Ethernet USB gadget kernel module on boot.
- Create an empty file called ssh in the same folder where cmdline.txt and config.txt reside, in order to enable SSH on boot.
Almost there, now insert the memory card into your Pi, apply power (USB port nearest the edge) and boot it up. We are doing a headless boot, so you won’t need a display or keyboard. When the device boots your router will assign it an IP address. Use this address to connect to the device.
Notice your IP address, it should be something like 192.168.1.x. On mine it was 192.168.1.35.
- SSH into the device, “ssh pi@ipaddress”. On Windows, you can use Putty
- Login using user: pi Password: raspberry

Now we need to install the P4wnP1 program:

The install will take a little while to run:

When complete you should see a screen like below:

Before you reboot the Pi, let’s talk about what happened. Notice that the program says the IP address for the PI has been changed to 172.24.0.1, and it is accessible as a new Wi-Fi router that uses the SSID of P4wnP1 with the Wi-Fi password of MaMe82-P4wnP1.
When you reboot the Pi, these changes take effect. Go ahead and reboot the Pi.
Connect to the new Wi-Fi network P4wnP1
When the Pi reboots you will see a new Wi-Fi router available:

Go ahead and connect to this Wi-Fi network from your control computer.
You can now SSH (or use Putty) into the Pi at the new IP address 172.24.0.1:

Congratulations, you now have a fully functional P4wnP1!
Setting the Payload
Now all we need to do is set the Payload that we want to use when the PwnP1 is connected to a target. This is done by editing the setup.cfg file.
- Change to the P4wnP1 folder
- Edit the setup.cfg file using nano
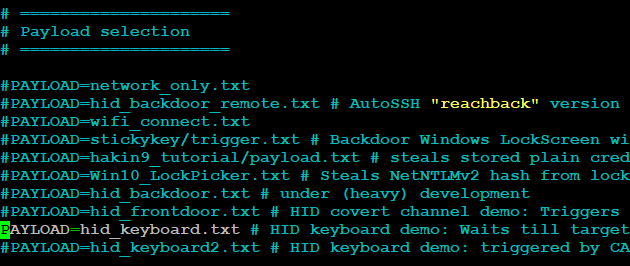
Go to the bottom of this file and you will see the available Payloads. It defaults to “network only”. Just Comment this out with a “#” sign, and remove the “#” from the payload line that you want to use.
Let’s try the “hid_backdoor_remote”:
- Comment out the “network_only” payload
- Uncomment the “hid_backdoor_remote” payload:

- Save and exit
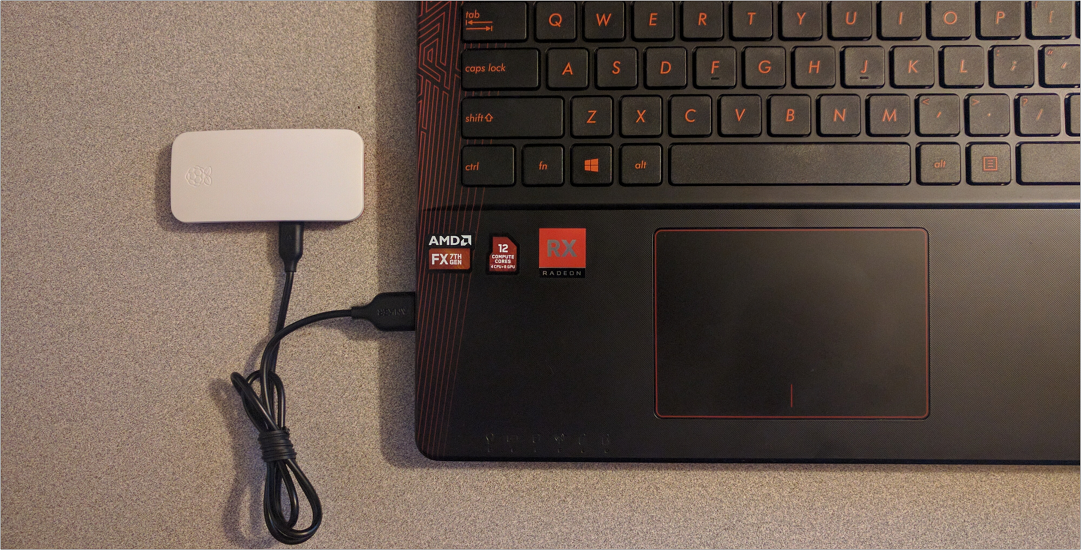
Now connect the Pi to the target using only the second USB port, the one towards the middle of the Pi, and give it a few seconds to register and set up. We can now connect to the P4wnP1 through the Wi-Fi network and have a remote connection to the target machine!
When you connect to the P4wnP1 Wi-Fi network, SSH into the Pi, and you should now see a new screen:

Type “help” to see available commands:

Notice it says “client not connected”.
Let’s go ahead and run “FireStage1” to connect the target machine:

You have several commands that you can run on the target system, or you can just type “shell” to drop into a full remote Windows 10 command prompt:

Very nice!
Hid (Rubber Ducky) Payloads
Next, we will take a look at a couple of the Human Interface Device (HID) payloads. Basically, these payloads allow the P4wnP1 to act like a Hak5 Rubber Ducky – turning the USB device into a unit that emulates a keyboard and sends keyboard commands a letter at a time to the computer.
In the setup.cfg file select the “hid_keyboard” payload:
Now go to the P4wnP1 “payloads” directory:

Here you will find the actual payload files for each attack. You can view and edit the payloads.
If we look at the “hid_payload.txt” file we can see what the payload will do when executed:
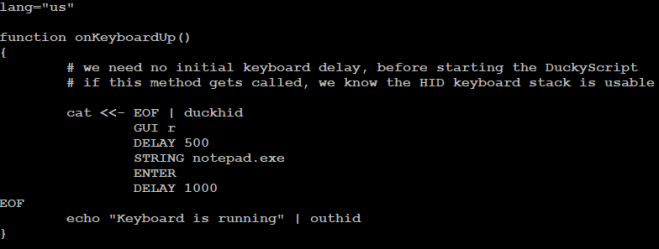
Important: Make sure the keyboard language is set to your country.
If you are familiar with “Rubber Ducky” scripts this will look extremely familiar to you. If not, the “Gui r” command opens a Windows run box, waits, and then types in the notepad command. Lastly it types, “Keyboard is running” in notepad automatically.
If we hook the P4wnP1 to the target system this is exactly what happens. Notepad will open and the text will be written on the screen, as seen below:

Obviously running notepad isn’t that useful to a security tester, but what it shows is that you can edit the payload file to enter any commands that you want.
Let’s look at a little more advanced version of the same concept.
Hid_Keyboard2 Payload
The “hid_keyboard2” payload adds a bit of a covert trigger to the previous attack. In this one, again Notepad is opened, but it also looks for certain keyboard input to trigger other code to run.
Let’s take a closer look. Set the “hid_keyboard2.txt” payload in setup.cfg:

Next, go to the payload sub-directory and open the hid_keyboard2 text file. Make sure your language is selected for the keyboard or it will not work right:

When done, save and exit and connect the Pi to the target system.
Notepad should open, print out text and ask you to hit either the Caps lock, Scroll lock or Num lock keys. It then tells you which key you pressed and changes the Pi led blink frequency:

Again, this is like a “Proof of Concept” to show what the P4wnP1 can do. The beauty here is that you could set different things up to run based on triggers.
Hakin9 Tutorial Payload
Lastly let’s look at the Hakin9 tutorial payload. This payload captures browser creds from the Windows system, and stores them on the Pi using a PowerShell script.
- Select the “haking9_tutorial/payload.txt” payload:

You can read the payload file located in the payloads/hakin9_tutorial directory to see what it will do:

The payload uses the RNDIS network device, enables the HID keyboard interface so it can enter keyboard commands, and also enables USB mass storage so it can save information to the Pi. If you read through the payload you can see that it accomplishes this by running a PowerShell command that calls “stealcreds.ps1”.
You can view the “stealcreds.ps1” file in the same directory to see what it does if you wish.
When the P4wnP1 is attached to the target system, the PI is assigned a drive letter, and the PowerShell executes (rather quickly). A text file should appear on the PI USB drive:

If you open the text file you will see any browser credentials that were saved on the system:

The nice thing is that you could use your own PowerShell script, which greatly increases the capability of the P4wnP1.
Conclusion
In this article, we only covered some of the basic features of the P4wnP1. There are additional payloads and features that are available. I am a big Pi Zero W fan, and as a security professional, really enjoy the features and capabilities that the P4wnP1 platform offers. The P4wnP1 seems to be a very active project, so this is something to definitely keep an eye on. I also have a section on P4wnP1 in my newest book – “Basic Security Testing with Kali Linux, 3rd Edition“.

Reblogged this on CYBER ARMS – Computer Security.
LikeLike
This is great, I have a couple of different SD cards setup that can do all of these tasks separately but having it all in one place is perfect!
LikeLike
I was wondering if there is an updated version of this tutorial as the newest version of raspian is buster. I installed it on my sd card and followed all the steps and i cannot get my computer to recognize the new usb connected device. please help.
LikeLiked by 1 person
There is actually a whole new version of P4wnP1! P4wnP1 ALOA, I thought I wrote an article on the new version, I will work on one. Though it is covered in my latest book, “Security Testing with Raspberry Pi”.
LikeLike