
If you want to run Kali Linux on a Raspberry Pi, one great solution is Re4son’s “Sticky Fingers Kali-Pi”. Kali-Pi runs on Raspberry Pi/0/2/3 and includes touch screen and Bluetooth support out of the gate.
If you follow the Kali forums, then you have probably seen Kali-Pi mentioned in any Raspberry Pi related post. Kali-Pi was even featured a few months ago on the Kali.org website:
https://www.kali.org/news/kali-drones-portable-ctf-builds-raspberry-pi-craziness-and-more/
Kali-Pi’s pre-configured image has several tools already installed and ready to use. This includes the “Mana-Toolkit”.
The author of Kali-Pi provides instructions for installing it manually, but also provides a download link for a ready to go pre-configured Pi image. In this article we will look at installing the pre-configured Kali-Pi image on a Pi3 and quickly cover using it to run the rogue Wi-Fi attack platform, the Mana-Toolkit.
For this article you will need:
- Raspberry Pi 3, with power supply and 32 GB micro SDcard
- Touchscreen display case (I used a Raspberry Pi 7” touchscreen)
- Re4son’s Kali-Pi software
- SD card writer
If you want to perform Wi-Fi scanning, or anything that requires putting the Wi-Fi in monitoring mode, you will probably also want to use a USB Wi-Fi adapter. I used a TP-Link TL-WN722N.
Warning: As always, this article is for educational purposes only. It is illegal to access a computer without the user’s permission. Only use this in a lab environment using systems that you own. Ye have been warned.
Installing
Instructions for using the pre-configured image are included on the author’s website, so I will only briefly touch on the install process. It is always a good idea to check the author’s site for any install changes and the latest install information.
Overview with quick install and manual install instructions:
https://whitedome.com.au/re4son/kali-pi/
As mentioned, I will be using the Pi 3 pre-configured image available here:
https://whitedome.com.au/re4son/sticky-fingers-kali-pi-pre-installed-image/
Let’s get started:
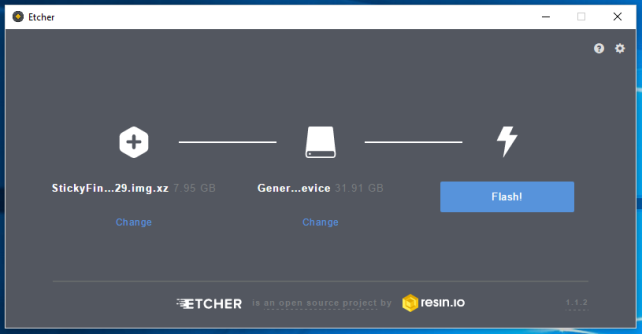
- Download the Kali-Pi image for your Pi version
- Write image to the microSD card (Etcher works great!)
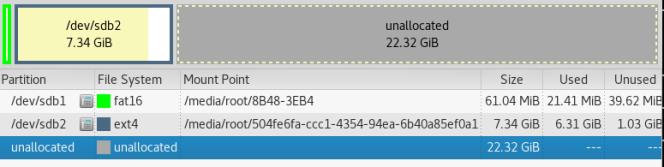
- Resize the partition
If you are using a SD card larger than 8GB it will only be partitioned as 8 GB. You need to re-size the partition to get full use of the card. Instructions are provided on the Re4son webpage.
Some of the installed tools can take up a lot of space. I used a 32 GB SD card, so I needed to resize mine so it could access the entire card. I just used the “gparted” command in a Linux VM to resize the partition.
Basically, I ran gparted (make sure you select the correct partition), clicked on the image partition, clicked the Resize button and dragged the partition border across the open space.
After:

Then I clicked the “Apply All Operations” button and it resized the partition.
After the image has successfully installed and the card resized (if needed), we are all set to use it on our Pi.
Insert the memory card into your Pi, and assemble your touchscreen case:
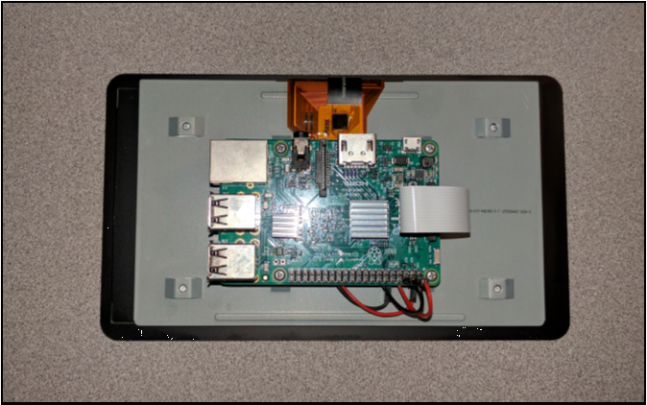
Connect your peripherals to the Pi, apply power and let it boot up.
- Login: root/ toor
- Click “Use Default Config”
- Open a terminal window
Next you need to setup your screen, here are the directions from the Quick Start Guide:
- cd /usr/local/src/re4son-kernel_4*
- mount /dev/mmcblk0p1 /boot
- ./re4son-pi-tft-setup -u (updates re4son-pi-tft-setup to the latest version)
- ./re4son-pi-tft-setup -h (lists all options – pick your screen from the list)
- ./re4son-pi-tft-setup -t <your screen> -d /home/pi (Say “Y” when asked if you want the console to be displayed on the TFT screen)
- reboot

Note: At this point I lost my built-in wireless connection. As I was using a wired connection, it wasn’t a big deal. Though I was able to get it back after a few reboots and trying the different Nexmon switches you can use with the re4son-pi-tft-setup.
And that is it! You should have a functional Kali Linux install on your Raspberry Pi. Now let’s take a look at running the Mana-Toolkit, which is already installed.
Mana-Toolkit
Tool Website: https://github.com/sensepost/mana
In this section we will cover using the Mana Full NAT script. This creates a fully functional open Access Point for targets to connect to and also performs a man-in-the-middle attack with SSL strip. What this means is that people will see an open Wi-Fi router to connect to, and when they do, we will get a copy of any website they visit or any credentials they enter, possibly even when they are using HTTPS.
For this to be successful I had the Pi connected to the internet through the Lan port, and used my TP-Link USB Wi-Fi adapter for Mana’s rogue access point. That way anyone who connected to the fake Wi-Fi access point created by Mana, would be able to connect out to the internet through the LAN connection.
Important Directories:
- Mana program: /usr/share/mana-toolkit
- Mana configuration settings: /etc/mana-toolkit/hostapd-mana.conf
- Mana startup scripts: /usr/share/mana-toolkit/run-mana
- Mana captured traffic & logs: /var/lib/mana-toolkit
Running Mana
In a terminal:
- cd /usr/share/mana-toolkit
- cd run-mana
In this directory you will find several scripts that you can run:

See the Mana documentation for a complete description of what each script does. For our demonstration we will run the start-nat-full script that creates a Wi-Fi Access Point, performs SSL strip (attempting to downgrade HTTPS to HTTP) and a man-in-the-middle attack on any clients that connect to it. It then captures any credentials and cookies and stores them in the log folder.
To start the tool:
- ./start-nat-full.sh
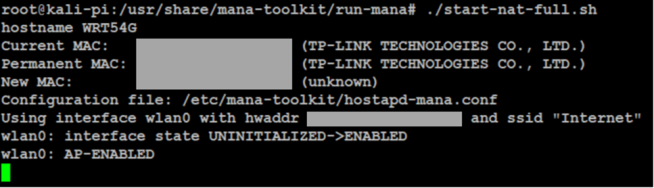
A new open Wi-Fi network should appear. We will be notified when someone connects to the rogue AP, and if they surf to a webpage where credentials are entered, we should see a copy of them in the Mana-Toolkit logs, as seen below.
I connected to the rogue AP from my smartphone and attempted to check my e-mail:

Any activity captured by Mana was listed in the Log directory files:
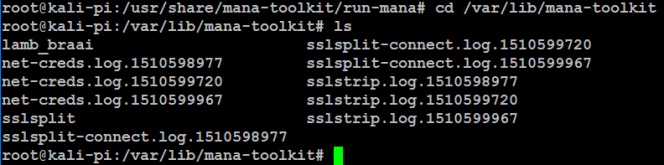
Scanning through the logs I found this:

Many websites and browsers will now warn you that something is not right and that the browser could not make an encrypted https connection to the host network. But it does still work on some websites.
Metapackages
The Kali-Pi image comes pre-installed with some tools, like the Mana-Toolkit, beEF, Metasploit, mysql, mitmf and a few additional tools, but you can install the Kali metapackages if you would like. Kali Metapackages are security tool packages grouped by function.
If you have 32 GB of space you can install the full Kali Linux install:
- apt-get update
- apt-get upgrade
- Apt-get install kali-linux-full
But that will take forever, you probably want to install one of the more specialized packages. These are listed on the Kali Metapackages website:
https://tools.kali.org/kali-metapackages
Conclusion
In this brief introduction to Re4son’s Kali-Pi, we covered how to install the pre-configured image on a Pi3 and how to run the Mana Toolkit. Kali-Pi is a fully functional Kali Linux platform which can be expanded by installing additional Kali Metapackages (though I did run into some errors when trying to install a couple of the packages). There are many other interesting features of the Kali-Pi that we may look at in a future article. Re4son also makes a DV-Pi (Damn Vulnerable Pi) that could be used for IoT pentesting, we will most definitely look at this at some point.

Leave a comment